Last updated on 2026-02-15 | Edit this page
Overview
Questions
- How do I manage release notes without merge conflicts?
- How do I publish my package to the world (safely)?
Objectives
- Use
towncrierto manage changelogs using fragments. - Build package artifacts using
uv build. - Publish packages to TestPyPI using
uvx twine.
The Changelog Problem
Before we publish code, we need to tell our users what changed. The
naive way is to edit a CHANGELOG.md file
manually. The Problem: If two people define a new
feature in a Pull Request, they both edit the top of CHANGELOG.md. This causes Merge
Conflicts.
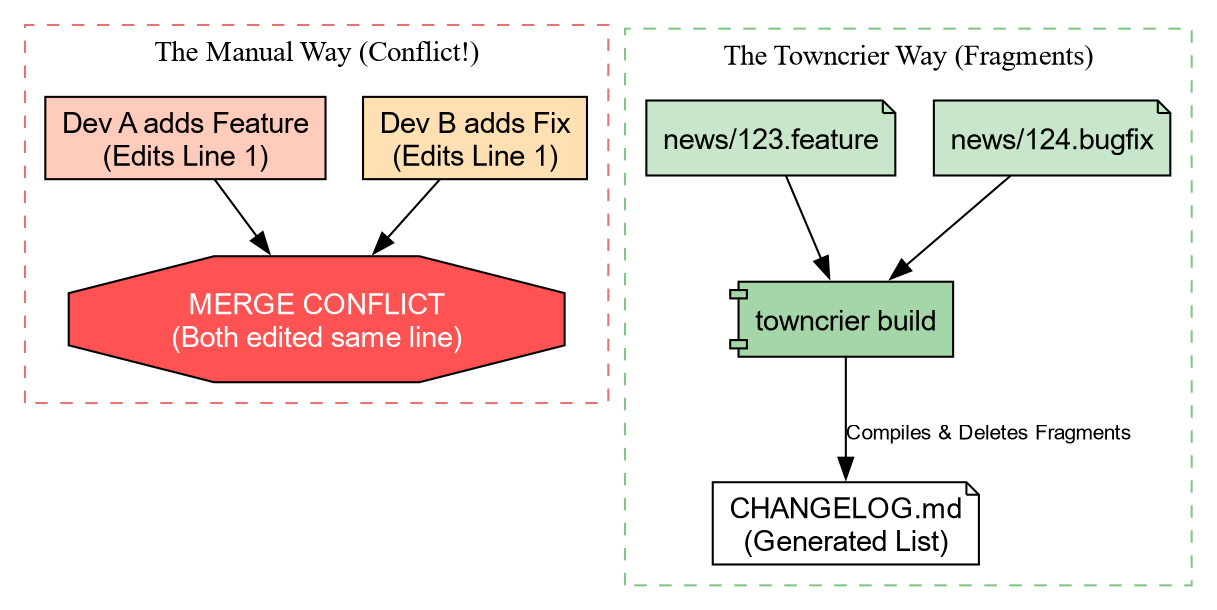
Solution: Towncrier
Towncrier solves this by using “News Fragments”. Instead of editing one big file, you create a tiny file for each change.
Let’s set it up.
Add the configuration to pyproject.toml:
Now, create the news directory:
Creating a News Fragment
Imagine we just added the center_of_mass function. We create a file in
news/. The name must end with the type of
change (.feature, .bugfix, .doc).
When we are ready to release, we run:
Towncrier will:
- Collect all files in
news/. - Format them into a bulleted list.
- Prepend them to
CHANGELOG.md. - Delete the fragment files.
No merge conflicts, ever!
Building Artifacts
Now that our docs are ready, we need to package our code. Python uses two formats:
- sdist (.tar.gz): The raw source code.
- Wheel (.whl): A pre-built, ready-to-install archive.
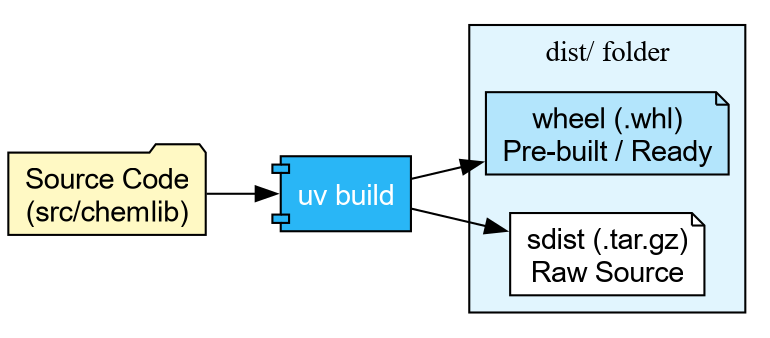
With uv, building is trivial:
Building source distribution...
Building wheel...
Successfully built dist/chemlib-0.1.0.tar.gz and dist/chemlib-0.1.0-py3-none-any.whl
Publishing to TestPyPI
We are finally ready to ship.


Warning: The real PyPI is permanent. For this workshop, we use TestPyPI (test.pypi.org), which is a separate repository. By default, PyPI is used for resolution.
Step 1: Get a Token
- Go to TestPyPI and create an account.
- Go to Settings -> API Tokens -> Create “Entire account” token.
- Copy the token (starts with
pypi-).
Step 2: Upload using Twine We don’t need to install
twine permanently. We can use uvx (the tool execution runner) to fetch and run
it in one go.
BASH
# Replace __token__ with your actual token value
uvx twine upload \
    --repository testpypi \
    --username __token__ \
    --password pypi-AgENdGVzdC5we... \
    dist/*
If successful, you can now see your package on the TestPyPI website, and can be installed with
Challenge: The Full Cycle
You have built the artifact. Now prove it works!
Upload your package to TestPyPI using the credentials you generated.
Create a one-line script check_install.py: import chemlib; print(chemlib.file).
Use uv run to execute this script, but
force it to install your package from TestPyPI.
TestPyPI is a separate “index” (a library catalog). You will need to
tell uv where to look using the flag --extra-index-url https://test.pypi.org/simple/.
We use “extra” so it can still find dependencies like numpy on the main PyPI.
- Upload:
- Verify: We use
--with chemlibto request an ephemeral environment containing our package.
BASH
echo "import chemlib; print('Success:', chemlib.file)" > check_install.py
uv run --extra-index-url https://test.pypi.org/simple/ --with chemlib check_install.py
Output:
Success: .../uv/.../site-packages/chemlib/init.pyAutomating Release (GitHub Actions)
Warning: This may not be a good
idea, since PyPI releases cannot be removed. It is better to
set this up for TestPyPI and manually use twine or uv or
pdm publish and others locally after
ensuring everything works.
We can teach GitHub to do this for us. We use Trusted Publishing (OIDC) so we don’t even need to copy-paste passwords. The CI episode will cover GitHub Actions in full detail; for now, here is a preview of what an automated release job looks like:
YAML
release:
  needs: check
  if: github.event_name == 'push' && startsWith(github.ref, 'refs/tags/v')
  runs-on: ubuntu-latest
  permissions:
    id-token: write  # Required for OIDC
    contents: read

  steps:
    - uses: actions/checkout@v4
    - uses: astral-sh/setup-uv@v5

    - name: Build
      run: uv build

    - name: Publish to TestPyPI
      uses: pypa/gh-action-pypi-publish@release/v1
      with:
        repository-url: https://test.pypi.org/legacy/
        # No password needed if configured in PyPI settings!
Now, whenever you push a tag (e.g., v0.1.0), GitHub will build and ship your code
automatically.
- Towncrier prevents changelog conflicts by using “News Fragments”.
-
uv build creates standard
sdistandwheelartifacts. - uvx twine allows one-off publishing without polluting your environment.
- TestPyPI is the sandbox for practicing release engineering.