If It Isn't Documented, It Doesn't Exist
Last updated on 2026-02-15 | Edit this page
Estimated time: 40 minutes
Overview
Questions
- How do I generate professional documentation for my Python package?
- What are docstrings, and how do they become web pages?
- How do I link my documentation to other projects like NumPy?
Objectives
- Write NumPy-style docstrings for functions and modules.
- Configure
Sphinxwithautoapito generate an API reference automatically. - Build HTML documentation locally and verify it.
- Deploy documentation to the web using GitHub Pages.
The Documentation Gap
Our chemlib package now has tests, a
changelog, and a release pipeline. A collaborator can install it from
TestPyPI with a single command. But when they type import chemlib, how do they know what functions
are available? What arguments does center_of_mass expect? What does it return?
Without documentation, the only option is to read the source code. That works for you (the author), but it does not scale. New users, reviewers, and your future self all benefit from a browsable, searchable reference.
Writing Good Docstrings
The foundation of automated documentation is the
docstring: a string literal that appears as the first
statement of a function, class, or module. Python stores it in the __doc__ attribute, and tools like Sphinx extract
it to build reference pages.
The NumPy docstring style is the most common in scientific Python.
Let’s update src/chemlib/geometry.py with
proper docstrings:
SH
import numpy as np


def center_of_mass(atoms):
    """Calculate the geometric center of mass of a set of atoms.

    Parameters
    ----------
    atoms : list of list of float
        A list of 3D coordinates, where each element is ``[x, y, z]``.

    Returns
    -------
    numpy.ndarray
        The mean position as a 1D array of shape ``(3,)``.

    Examples
    --------
    >>> center_of_mass([[0, 0, 0], [2, 0, 0]])
    array([1., 0., 0.])
    """
    data = np.array(atoms)
return np.mean(data, axis=0)Challenge: Document a Second Function
Imagine you add a helper function distance to chemlib/geometry.py that computes the Euclidean
distance between two points. Write a complete NumPy-style docstring for
it.
Your docstring should include:
- A one-line summary.
- A
Parameterssection with types. - A
Returnssection. - An
Examplessection.
PYTHON
def distance(r_a, r_b):
    """Compute the Euclidean distance between two points.

    Parameters
    ----------
    r_a : array_like
        Coordinates of the first point, shape ``(n,)``.
    r_b : array_like
        Coordinates of the second point, shape ``(n,)``.

    Returns
    -------
    float
        The Euclidean distance between ``r_a`` and ``r_b``.

    Examples
    --------
    >>> distance([0.0, 0.0, 0.0], [1.0, 1.0, 1.0])
    1.7320508075688772
    """
    data_a = np.array(r_a)
    data_b = np.array(r_b)
    return float(np.linalg.norm(data_a - data_b))
Setting Up Sphinx
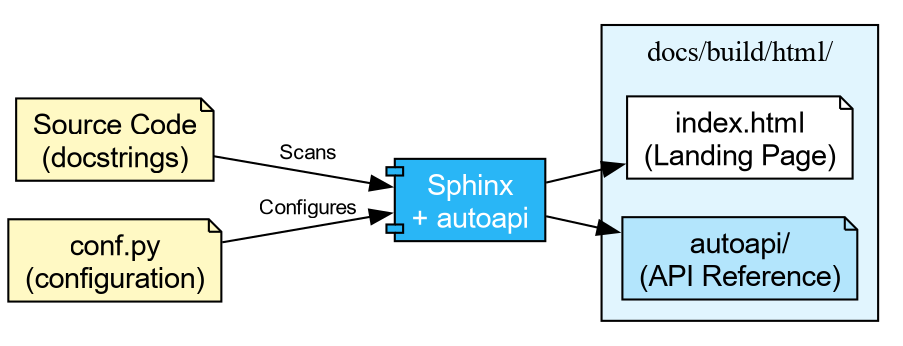
Sphinx is the standard documentation generator in the Python ecosystem. It reads source files (reStructuredText or Markdown), follows imports into your package, and produces HTML, PDF, or ePub output.
We will use a dependency group (introduced in the
pyproject.toml episode) to keep
documentation tools separate from runtime and dev dependencies:
This creates a docs group in pyproject.toml:
TOML
[dependency-groups]
dev = ["ruff>=0.1.0", "pytest>=8.0.0"]
docs = ["sphinx>=8.0", "sphinx-autoapi>=3.0", "shibuya>=2024.0"]
Now initialise the documentation skeleton:
Create the Sphinx configuration file docs/source/conf.py:
SH
import os
import sys

# -- Path setup --------------------------------------------------------------
sys.path.insert(0, os.path.abspath("../../src"))

# -- Project information -----------------------------------------------------
project = "chemlib"
author = "Your Name"

# -- Extensions --------------------------------------------------------------
extensions = [
    "autoapi.extension",       # Auto-generates API pages from source
    "sphinx.ext.viewcode",     # Adds [source] links to API docs
    "sphinx.ext.intersphinx",  # Cross-links to NumPy, Python docs
]

# -- AutoAPI -----------------------------------------------------------------
autoapi_dirs = ["../../src"]   # Where to find the package source
autoapi_type = "python"

# -- Intersphinx -------------------------------------------------------------
intersphinx_mapping = {
    "python": ("https://docs.python.org/3", None),
    "numpy": ("https://numpy.org/doc/stable", None),
}

# -- Theme -------------------------------------------------------------------
html_theme = "shibuya"
What Each Extension Does
autoapi-
Scans your
src/directory and builds API reference pages for every module, class, and function. You do not need to write.rstfiles by hand. viewcode- Adds “\[source\]” links next to each documented object, letting readers jump to the implementation.
intersphinx-
Enables cross-project linking. When you write
:class:\`numpy.ndarray\`in a docstring, Sphinx automatically links to the NumPy documentation.
Finally, create a minimal docs/source/index.rst:
Building the Documentation
With everything in place, build the HTML output:
...
[autoapi] Reading files with sphinx-autoapi
[autoapi] Found package: chemlib
...
build succeeded.

The HTML pages are in docs/build/html.
Open docs/build/html/index.html in your
browser. You should see a clean site with an “API Reference” section
listing every function and its docstring.
Challenge: The Missing Docstring
- Open the generated API reference page in your browser.
- Find a function that has no docstring (or only a placeholder).
- Add a proper NumPy-style docstring to it in the source code.
- Rebuild with the
sphinx-buildcommand above. - Refresh the page and verify the docstring appears.
Deploying to the Web
Building locally is useful during development, but you ultimately want the documentation available online. The most common approach in the Python ecosystem is GitHub Pages, deployed automatically via GitHub Actions.
The next episode covers Continuous Integration in detail. For now, the key idea is that GitHub Actions can run commands automatically when you push code. The pattern for documentation deployment is:
-
Build: Check out the code, install the
docsgroup, runsphinx-build. - Upload: Save the built HTML as a workflow artifact.
-
Deploy: On pushes to
main, publish the artifact to GitHub Pages.
SH
name: Documentation

concurrency:
  group: "pages"
  cancel-in-progress: true

on:
  push:
    branches: [main]
  pull_request:

jobs:
  docs:
    runs-on: ubuntu-latest
    permissions:
      contents: write

    steps:
      - uses: actions/checkout@v4
        with:
          fetch-depth: 0

      - uses: astral-sh/setup-uv@v5

      - name: Install dependencies
        run: uv sync --group docs

      - name: Build documentation
        run: uv run sphinx-build -b html docs/source docs/build/html

      - name: Upload artifact
        uses: actions/upload-artifact@v4
        with:
          name: documentation
          path: docs/build/html

      - name: Deploy to GitHub Pages
        if: github.event_name == 'push' && github.ref == 'refs/heads/main'
        uses: peaceiris/actions-gh-pages@v4
        with:
          github_token: ${{ secrets.GITHUB_TOKEN }}
publish_dir: docs/build/htmlOn pull requests the workflow builds the documentation and reports success or failure, but does not deploy. This ensures broken docs never reach the live site, while still catching build errors before merge.
PR Previews
Catching a broken build is useful, but what about visual regressions—a mangled table, a missing image, or a heading that renders wrong? You cannot tell from a green checkmark alone.
A PR preview solves this: a second workflow waits for the docs build to finish, then posts a comment on the Pull Request with a link to a temporary hosted copy of the HTML output. Reviewers can click the link and see exactly what the documentation will look like before merging.

Add this second workflow file .github/workflows/pr_comment.yml:
SH
name: Comment on pull request

on:
  workflow_run:
    workflows: ["Documentation"]
    types: [completed]

jobs:
  pr_comment:
    if: >-
      github.event.workflow_run.event == 'pull_request' &&
      github.event.workflow_run.conclusion == 'success'
    runs-on: ubuntu-latest
    permissions:
      pull-requests: write
      issues: write
      actions: read

    steps:
      - uses: HaoZeke/doc-previewer@v0.0.1
        with:
          workflow_run_id: ${{ github.event.workflow_run.id }}
          head_sha: ${{ github.event.workflow_run.head_sha }}
          artifact_name: documentation
This uses a workflow_run trigger, which
means it only fires after docs.yml completes. The two-workflow pattern is
a deliberate security measure: the build workflow runs with the PR
author’s (limited) permissions, while the comment workflow runs with
write access to post on the PR. This prevents a malicious PR from using
elevated permissions during the build step.
-
Yes. Sphinx resolves the
:class:\`numpy.ndarray\`role using the intersphinx inventory downloaded fromnumpy.org. - The link points to
https://numpy.org/doc/stable/reference/generated/numpy.ndarray.html.
This works because we configured intersphinx_mapping with the NumPy docs URL in
conf.py. Sphinx fetches a small inventory
file (objects.inv) from that URL at build
time and uses it to resolve cross-references.
-
Docstrings are the raw material for documentation.
Use the NumPy style (
Parameters,Returns,Examples) for scientific code. -
Sphinxwithautoapigenerates a complete API reference by scanning your source code, requiring no manual.rstfiles per module. -
intersphinxenables cross-project links (e.g., to NumPy, Python), making your documentation part of the broader ecosystem. - Documentation builds can be automated with GitHub Actions and
deployed to GitHub Pages on every push to
main. - PR Previews let reviewers see documentation changes visually before merging, catching formatting issues that a green checkmark cannot.