All in One View
Content from Writing Reproducible Python
Last updated on 2026-02-12 | Edit this page
Overview
Questions
- What is the difference between the standard library and third-party packages?
- How do I share a script so that it runs on someone else’s computer?
Objectives
- Import and use the
pathlibstandard library. - Identify when a script requires external dependencies (like
numpy). - Write a self-contained script that declares its own dependencies using inline metadata.
- Share a script which reproducibly handles
condadependencies alongside Python.
The Humble Script
Most research software starts as a single file. You have some data, you need to analyze it, and you write a sequence of commands to get the job done.
Let’s start by creating a script that generates some data and saves
it. We will use the standard library module pathlib to handle file paths safely across
operating systems (Windows/macOS/Linux).
PYTHON
import random
from pathlib import Path

# Define output directory
DATA_DIR = Path("data")
DATA_DIR.mkdir(exist_ok=True)

def generate_trajectory(n_steps=100):
    print(f"Generating trajectory with {n_steps} steps...")
    path = [0.0]
    for _ in range(n_steps):
        # Random walk step
        step = random.uniform(-0.5, 0.5)
        path.append(path[-1] + step)
    return path

if __name__ == "__main__":
    traj = generate_trajectory()
    output_file = DATA_DIR / "trajectory.txt"

    with open(output_file, "w") as f:
        for point in traj:
            f.write(f"{point}\n")

print(f"Saved to {output_file}")This script uses only Built-in modules (random, pathlib).
You can send this file to anyone with Python installed, and it will
run.
The Need for External Libraries
Standard Python is powerful, but for scientific work, we almost
always need the “Scientific Stack”: numpy,
pandas/polars, or matplotlib.
Let’s modify our script to calculate statistics using numpy.
PYTHON
import random
from pathlib import Path
import numpy as np # new dependency!!

DATA_DIR = Path("data")
DATA_DIR.mkdir(exist_ok=True)

def generate_trajectory(n_steps=100):
    # Use numpy for efficient array generation
    steps = np.random.uniform(-0.5, 0.5, n_steps)
    trajectory = np.cumsum(steps)
    return trajectory

if __name__ == "__main__":
    traj = generate_trajectory()
    print(f"Mean position: {np.mean(traj):.4f}")
print(f"Std Dev: {np.std(traj):.4f}")The Dependency Problem
If you send this updated file to a colleague who just installed Python, what happens when they run it?
The Modern Solution: PEP 723 Metadata
Traditionally, you would send a requirements.txt file alongside your script, or
leave comments in the script, or try to add documentation in an
email.
But files get separated, and versions get desynchronized.
PEP
723 is a Python standard that allows you to embed
dependency information directly into the script file. Tools like uv (a fast Python package manager) can read this
header and automatically set up the environment for you.

We can add a special comment block at the top of our script:
PYTHON
# /// script
# requires-python = ">=3.11"
# dependencies = [
#     "numpy",
# ]
# ///

import numpy as np

print("Hello I don't crash anymore..")
# ... rest of script ...
Now, instead of manually installing numpy, you run the script using uv:
When you run this command:
-
uvreads the metadata block. - It creates a temporary, isolated virtual environment.
- It installs the specified version of
numpy. - It executes the script.
This guarantees that anyone with uv
installed can run your script immediately, without messing up their own
python environments.
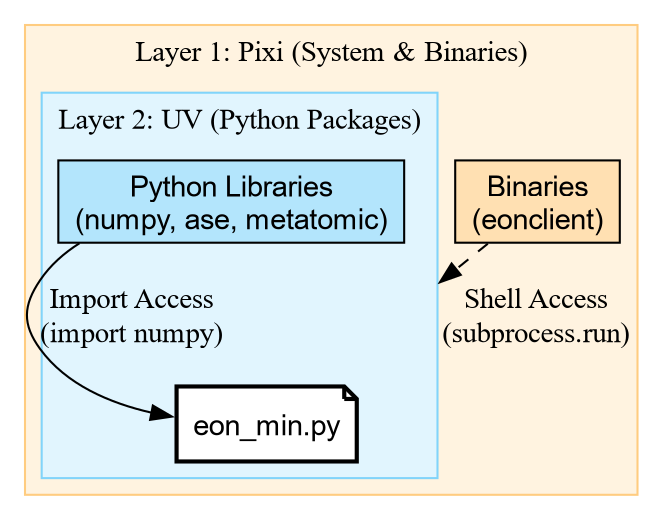
Beyond Python: The pixibang
PEP 723 is fantastic for installable Python packages [fn:: most often this means things you can find on PyPI).
However, for scientific software, we often rely on compiled binaries
and libraries that are not Python packages—things like LAMMPS, GROMACS,
or eOn a server-client
tool for exploring the potential energy surfaces of atomistic
systems.
If your script needs to run a C++ binary, pip and uv cannot
help you easily. This is where pixi comes in.
pixi is a package manager
built on the conda ecosystem. It can
install Python packages and compiled binaries. We can
use a “pixibang”
script to effectively replicate the PEP 723 experience, but for the
entire system stack.
Example: Running minimizations with eOn and PET-MAD
Let’s write a script that drives a geometry minimization 1. This requires:
- Metatrain/Torch
- For the machine learning potential.
- rgpycrumbs
- For helper utilities.
- eOn Client
- The compiled C++ binary that actually performs the minimization.
First, we need to create the input geometry file pos.con in our directory:
BASH
cat << 'EOF' > pos.con
Generated by ASE
preBox_header_2
25.00   25.00   25.00
90.00   90.00   90.00
postBox_header_1
postBox_header_2
4
2 1 2 4
12.01 16.00 14.01 1.01
C
Coordinates of Component 1
  11.04   11.77   12.50 0    0
  12.03   10.88   12.50 0    1
O
Coordinates of Component 2
  14.41   13.15   12.44 0    2
N
Coordinates of Component 3
  13.44   13.86   12.46 0    3
  12.50   14.51   12.49 0    4
H
Coordinates of Component 4
  10.64   12.19   13.43 0    5
  10.59   12.14   11.58 0    6
  12.49   10.52   13.42 0    7
  12.45   10.49   11.57 0    8
EOF
Now, create the script eon_min.py. Note
the shebang line, and the use of a git
revision!
PYTHON
#!/usr/bin/env -S pixi exec --spec eon --spec uv -- uv run
# /// script
# requires-python = ">=3.11"
# dependencies = [
#     "ase",
#     "metatrain @ git+https://github.com/metatensor/metatrain@492f0bfaeb3ea72fda4252b0dd6c055363cf199a",
#     "rgpycrumbs",
# ]
# ///

from pathlib import Path
import subprocess

from rgpycrumbs.eon.helpers import write_eon_config
from rgpycrumbs.run.jupyter import run_command_or_exit

repo_id = "lab-cosmo/upet"
tag = "v1.1.0"
url_path = f"models/pet-mad-s-{tag}.ckpt"
fname = Path(url_path.replace(".ckpt", ".pt"))
fname.parent.mkdir(parents=True, exist_ok=True)
subprocess.run(
    [
        "mtt",
        "export",
        repo_id,
        url_path,
        "-o",
        fname,
    ],
    check=True,
)
print(f"Successfully exported {fname}.")

min_settings = {
    "Main": {"job": "minimization", "random_seed": 706253457},
    "Potential": {"potential": "Metatomic"},
    "Metatomic": {"model_path": fname.absolute()},
    "Optimizer": {
        "max_iterations": 2000,
        "opt_method": "lbfgs",
        "max_move": 0.5,
        "converged_force": 0.01,
    },
}

write_eon_config(".", min_settings)
run_command_or_exit(["eonclient"], capture=True, timeout=300)
Make it executable and run it:
Unpacking the Shebang
The magic happens in this line: #!/usr/bin/env -S pixi exec --spec eon --spec uv -- uv run
This is a chain of tools:
-
pixi exec: Create an environment with
pixi. -
–spec eon: Explicitly request the
eonpackage (which contains the binaryeonclient). -
–spec uv: Explicitly request
uv. -
– uv run: Once the outer environment exists with
eOnanduv, it hands control over touv run. -
PEP 723:
uv runreads the script comments and installs the Python libraries (ase,rgpycrumbs).
This gives us the best of both worlds: pixi provides the
compiled binaries, and uv handles the fast Python
resolution.
The Result
When executed, the script downloads the model, exports it using metatrain, configures eOn, and runs the
binary.
[INFO] - Using best model from epoch None
[INFO] - Model exported to '.../models/pet-mad-s-v1.1.0.pt'
Successfully exported models/pet-mad-s-v1.1.0.pt.
Wrote eOn config to 'config.ini'
EON Client
VERSION: 01e09a5
...
[Matter]          0     0.00000e+00         1.30863e+00      -53.90300
[Matter]          1     1.46767e-02         6.40732e-01      -53.91548
...
[Matter]         51     1.56025e-03         9.85039e-03      -54.04262
Minimization converged within tolerence
Saving result to min.con
Final Energy: -54.04261779785156Challenge: The Pure Python Minimization
Create a script named ase_min.py that
performs the exact same minimization on pos.con, but uses the atomic simulation environment (ASE)
built-in LBFGS optimizer instead of
eOn.
Hint: You will need the metatomic package to load the potential in
ASE.
- Do we need
pixi? Try using theuvshebang only (nopixi). - Reuse the model file we exported earlier (
models/pet-mad-s-v1.1.0.pt). - Compare the “User Time” of this script vs the EON script.
PYTHON
# /// script
# requires-python = ">=3.11"
# dependencies = [
#     "ase",
#     "metatomic",
#     "numpy",
# ]
# ///

from ase.io import read
from ase.optimize import LBFGS
from metatomic.torch.ase_calculator import MetatomicCalculator

def run_ase_min():
    atoms = read("pos.con")

    # Reuse the .pt file exported by the previous script
    atoms.calc = MetatomicCalculator(
        "models/pet-mad-s-v1.1.0.pt",
        device="cpu"
    )

    # Setup Optimizer
    print(f"Initial Energy: {atoms.get_potential_energy():.5f} eV")

    opt = LBFGS(atoms, logfile="-") # Log to stdout
    opt.run(fmax=0.01)

    print(f"Final Energy:   {atoms.get_potential_energy():.5f} eV")

if __name__ == "__main__":
    run_ase_min()
Initial Energy: -53.90300 eV
Step Time Energy fmax
....
LBFGS: 64 20:42:09 -54.042595 0.017080
LBFGS: 65 20:42:09 -54.042610 0.009133
Final Energy: -54.04261 eVSo we get the same result, but with more steps…
Key Features of the Pixibang
-
The Shebang:
#!/usr/bin/env -S pixi run pythontells the shell to usepixito execute the script. -
Channels: We can specify
conda-forge(for general tools) andlab-cosmo(where the EON package lives). -
Binary Access: Because we listed
eonin the dependencies, theeonclientbinary is automatically downloaded and added to the path when the script runs.
This file is now a completely portable scientific workflow. You can
email it to a collaborator, and if they have pixi installed, they can run your simulation
without compiling a single line of C++.
Challenge: When to use what?
You have three scenarios. Which tool (pip, uv, or pixi) fits best?
- You are writing a quick script to plot a CSV file using
matplotlib. - You are writing a workflow that needs to run
openmmandffmpeg(to make movies). - You are working on a machine where you don’t have permission to install Conda, but you can use a virtual environment.
-
uv (PEP 723): Perfect for pure Python dependencies
like
matplotlib. It’s fast and standard. -
pixi: Perfect here.
openmmandffmpegare complex binary dependencies that are often painful to install viapipalone. - pip/uv: If you cannot use Conda/Pixi, standard Python tools are your fallback, though you might have to install system libraries manually.
| Feature | EON Script (Pixi) | ASE Script (UV) |
| Shebang | pixi exec ... -- uv run |
uv run |
| Engine | C++ Binary (eonclient) |
Python Loop (LBFGS) |
| Dependencies | System + Python | Pure Python |
| Use Case | HPC / Heavy Simulations | Analysis / Prototyping |
While the Python version seems easier to setup, the eOn C++ client is often more performant, and equally trivial with the c.
- PEP 723 allows inline metadata for Python dependencies.
- Use uv to run single-file scripts with pure Python
requirements (
numpy,pandas). - Use Pixi when your script depends on system
libraries or compiled binaries (
eonclient,ffmpeg). - Combine them with a Pixibang (
pixi exec ... -- uv run) for fully reproducible, complex scientific workflows.
A subset of the Cookbook recipe for saddle point optimization↩︎
Content from Modules, Packages, and The Search Path
Last updated on 2026-02-11 | Edit this page
Overview
Questions
- How does Python know where to find the libraries you import?
- What distinguishes a python “script” from a python “package”?
- What is an
__init__.pyfile?
Objectives
- Inspect the
sys.pathvariable to understand import resolution. - Differentiate between built-in modules, installed packages, and local code.
- Create a minimal local package structure.
From Scripts to Reusable Code
You have likely written Python scripts before: single files ending in
.py that perform a specific analysis or
task. While scripts are excellent for execution
(running a calculation once), they are often poor at facilitating
reuse.
Imagine you wrote a useful function to calculate the center of mass
of a molecule in analysis.py. A month
later, you start a new project and need that same function. You have two
options:
-
Copy and Paste: You copy the function into your new
script.
- Problem: If you find a bug in the original function, you have to remember to fix it in every copy you made.
- Importing: You tell Python to load the code from the original file.
Option 2 is the foundation of Python packaging. To do this effectively, we must first understand how Python finds the code you ask for.
How Python Finds Code
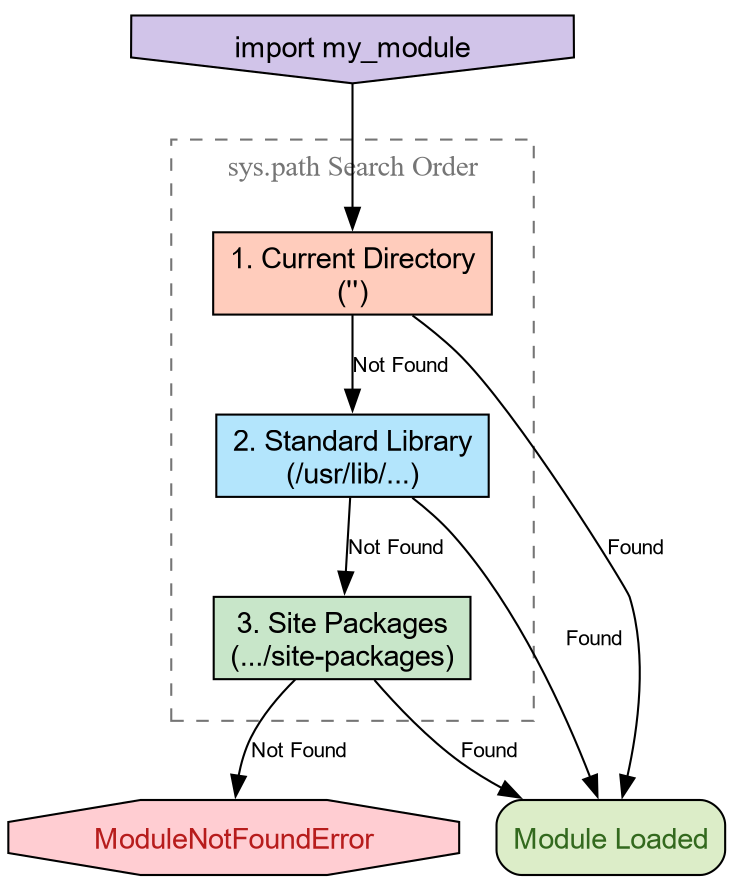
When you type import numpy, Python does
not magically know where that code lives. It follows a deterministic
search procedure. We can see this procedure in action using the built-in
sys module.
PYTHON
['',
 '/usr/lib/python314.zip',
 '/usr/lib/python3.14',
 '/usr/lib/python3.14/lib-dynload',
 '/usr/lib/python3.14/site-packages']
The variable sys.path is a list of
directory strings. When you import a module, Python scans these
directories in order. The first match wins.
-
The Empty String (’’): This represents the
current working directory. This is why you can always
import a
helper.pyfile if it is sitting right next to your script. -
Standard Library: Locations like
/usr/lib/python3.*contain built-ins likeos,math, andpathlib. -
Site Packages: Directories like
site-packagesordist-packagesare where tools likepip,conda, orpixiplace third-party libraries.
Python will import your local file instead of the
standard library math module.
Why? Because the current working directory
(represented by '' in sys.path) is usually at the top of the list. It
finds your math.py before scanning the
standard library paths. This is called “Shadowing” and is a common
source of bugs!
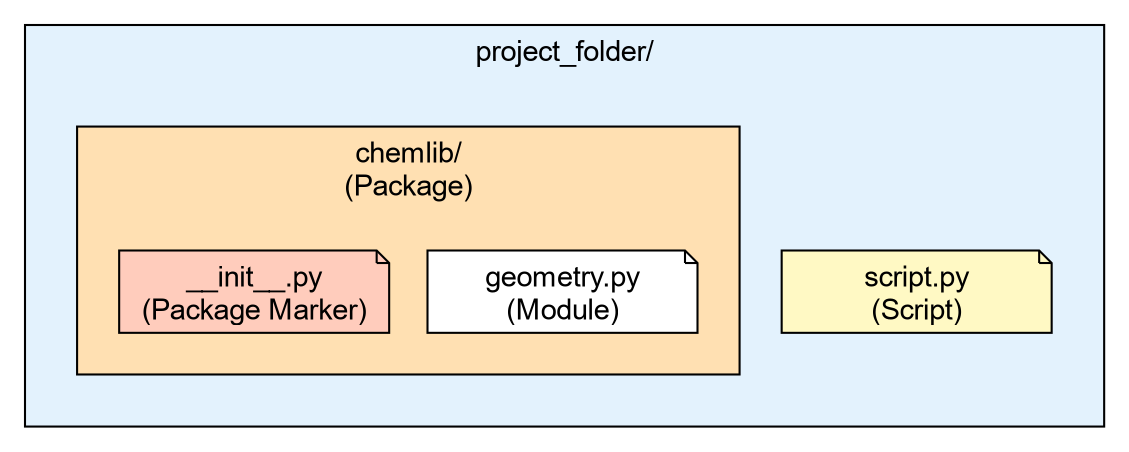
The Anatomy of a Package
- A Module
-
Is simply a single file ending in
.py. - A Package
-
Is a directory containing modules and a special file:
__init__.py.
Let’s create a very simple local package to handle some basic
chemistry geometry. We will call it chemlib.
Now, create a module inside this directory called geometry.py:
Your directory structure should look like this:
project_folder/
├── script.py
└── chemlib/
    ├── __init__.py
    └── geometry.py
The Role of __init__.py
The __init__.py file tells Python:
“Treat this directory as a package.” It is the first file executed when
you import the package. It can be empty, but it is often used to expose
functions to the top level.
Open chemlib/__init__.py and add:
Now, from the project_folder (the
parent directory), launch Python:
Loading chemlib package...
Calculating Center of Mass...
[0.0, 0.0, 0.0]
The “It Works on My Machine” Problem
We have created a package, but it is fragile. It relies entirely on
the Current Working Directory being in sys.path.
Challenge: Moving Directories
- Exit your python session.
- Change your directory to go one level up (outside your project
folder):
cd .. - Start Python and try to run
import chemlib.
What happens and why?
Output:
ModuleNotFoundError: No module named 'chemlib'Reason: You moved out of the folder containing chemlib. Since the package is not installed in
the global site-packages, and the current
directory no longer contains it, Python’s search through sys.path fails to find it.
To solve this, we need a standard way to tell Python “This package exists, please add it to your search path permanently.” This is the job of Packaging and Installation.
-
sys.pathis the list of directories Python searches for imports. - The order of search is: Current Directory -> Standard Library -> Installed Packages.
- A Package is a directory containing an
__init__.pyfile. - The
__init__.pyfile is the first file loaded whenimport PKGis run. - Code that works locally because of the current directory will fail when shared unless properly installed.
Content from The Project Standard: pyproject.toml
Last updated on 2026-02-11 | Edit this page
Overview
Questions
- How do I turn my folder of code into an installable library?
- What is
pyproject.tomland why is it the standard? - How does
uvsimplify project management? - Why use the
srclayout?
Objectives
- Use
uv initto generate a standardpyproject.toml(PEP 621). - Organize code using the
srclayout to prevent import errors. - Manage dependencies and lockfiles using
uv add. - Run code in an isolated environment using
uv run.
The Installation Problem
In the previous episode, we hit a wall: our chemlib package only worked when the interpreter
starts from the project folder. To fix this, we need to
Install the package into our Python environment.
As far as Python is concerned, an “installation” involves placing the
files somewhere the interpreter will find them. One of the simplest ways
involves setting the PYTHONPATH terminal
variable.
An annotated timeline of tooling:
- 2003
- PEP 301 defines PyPI
- 2004
-
setuptoolsdeclares dependencies - 2005
- packages are hosted on PyPI
- 2007
-
virtualenvis released to support multiple Python versions - 2008
-
pipis released for better dependency management - 2012
- multi-language distribution discussions from PEP 425 and PEP 427 1
- 2013
-
PEP 427 standardizes the
wheelformat, replacing eggs - 2016
-
PEP 518 introduces
pyproject.tomlto specify build dependencies 2 - 2017
-
PEP 517 separates the
build frontend (
pip) from the backend (flit,hatch,poetry) - 2020
-
PEP 621 standardizes
project metadata in
pyproject.toml, removing the need forsetup.pyconfiguration - 2022
- PEP 668 marks system Python environments as “externally managed” to prevent accidental breakage
- 2021
- PEP 665 attempts (and fails) to standardize lockfiles. 3
- 2024
- PEP 723 enables inline script metadata. 4
- 2024
-
PEP 735 introduces
dependency groups (e.g., separating
testorlintdependencies) without requiring a package build. - 2025
-
PEP 751 formalizes the
pylock.tomlfile.
Enter uv
Sometime in the early 2020s Python projects began adopting a Rust
core. Starting with ruff and moving up to
uv and pixi
in the past few years, these tools are often able cache aggressively,
and provide saner resolution of versions and other requirements for
packaging.
We will use uv, a convenient, modern Python package
manager, which also doubles as a
frontend, replacing pip with uv pip and a backend for pure Python
distributions.
Initializing a Project
Let’s turn our chemlib folder into a
proper project. We will use uv init to
generate the configuration.
BASH
# First, ensure we are in the project root
cd project_folder

# Initialize a library project
uv init --lib --name chemlib
This creates a `pyproject.toml` file. Let’s inspect it.
SH
[project]
name = "chemlib"
version = "0.1.0"
description = "Add your description here"
readme = "README.md"
authors = [
    { name = "Rohit Goswami", email = "rohit.goswami@epfl.ch" }
]
requires-python = ">=3.12"
dependencies = []

[build-system]
requires = ["uv_build>=0.9.26,<0.10.0"]
build-backend = "uv_build"
Breakdown
[project]- This table is standardized by PEP 621. It defines what your package is (name, version, dependencies).
[build-system]-
This defines how to build it, with an appropriate
build backend.
uvdefaults touv_build5.
The Python Packaging User Guide provides
a complete description of the fields in the pyproject.toml.
The src Layout
uv init --lib automatically sets up the
src
layout for us 6. Your folder structure should now look like
this:
project_folder/
├── pyproject.toml
├── src/
│   └── chemlib/
│       ├── __init__.py
│       └── py.typed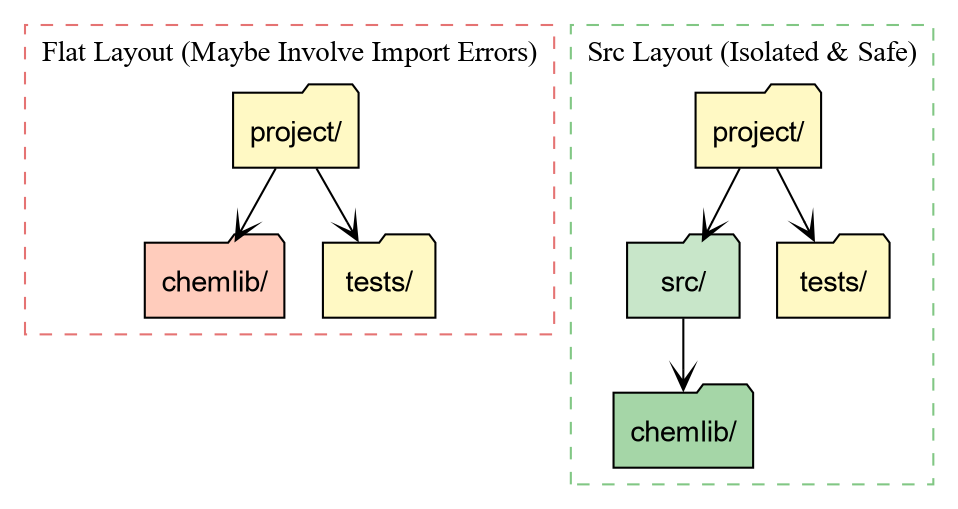
Why the src directory?
-
Testing against the installed package: With a flat
layout (package in root), running
pytestoften imports the local folder instead of the installed package. This hides installation bugs (like missing data files). -
Cleaner root: Your root directory defines the
project (config, docs, scripts), while
srcholds the product (the source code).
Managing Dependencies
In the first episode, we saw how numpy
caused crashes when not part of the environment. Let’s add numpy to our project properly.
BASH
uv add numpy
Using CPython 3.11.14
Creating virtual environment at: .venv
Resolved 2 packages in 120ms
      Built chemlib @ file:///home/goswami/blah
Prepared 2 packages in 414ms
Installed 2 packages in 20ms
 + chemlib==0.1.0 (from file:///home/goswami/blah)
 + numpy==2.4.2
This performs two critical actions:
- It adds
"numpy"to thedependencieslist inpyproject.toml. - It creates a
uv.lockfile.
The Lockfile: This file records the
exact version of numpy (e.g., 2.1.0) and every underlying dependency
installed. This guarantees that your teammates (and your future self)
get the exact same environment.
Running Code with implicit virtual environments
You might notice that uv didn’t ask you
to activate a virtual environment. It manages one for you
automatically.
To run code in this project’s environment, we use uv run.
.../project_folder/.venv/lib/python3.12/site-packages/chemlib/__init__.pyNotice the path! Python is loading chemlib from .venv/lib/.../site-packages. This means uv has performed an Editable
Install.
- We can edit
src/chemlib/geometry.py. - The changes appear immediately in the installed package.
- But Python treats it as a properly installed library.
Challenge: Update the Geometry Module
Now that numpy is installed, modify
src/chemlib/geometry.py to use it.
Remember to expose the functionality within __init__.py as in the previous lesson.
- Import
numpy. - Change
center_of_massto accept a list of positions and return the mean position usingnp.mean.
PYTHON
# src/chemlib/geometry.py
import numpy as np

def center_of_mass(atoms):
    print("Calculating Center of Mass with NumPy...")
    # Assume atoms is a list of [x, y, z] coordinates
    data = np.array(atoms)
    # Calculate mean along axis 0 (rows)
    com = np.mean(data, axis=0)
    return com
Test it using uv run:
Output:
Calculating Center of Mass with NumPy...
[1. 1. 1.]
Dependency Resolution and Conflicts
A robust package manager must handle Constraint Satisfaction Problems. You might require Library A, which relies on Library C (v1.0), while simultaneously requiring Library B, which relies on Library C (v2.0).
If these version requirements do not overlap, a conflict arises.
uv detects these impossible states before
modifying the environment.
Let us artificially construct a conflict using pydantic, a data validation library often used
alongside scientific tools.
Challenge: Inducing a Conflict
We will attempt to install incompatible versions of pydantic and pydantic-settings 7.
- Request an older version of
pydantic(<2.0). - Request a newer version of
pydantic-settings(>=2.0), which technically depends on Pydantic 2.0+.
The output should resemble:
× No solution found when resolving dependencies:
╰─▶ Because only the following versions of pydantic-settings are available:
        pydantic-settings<=2.0.0
        ...
    and pydantic-settings==2.0.0 depends on pydantic>=2.0b3, we can conclude that
    pydantic-settings>=2.0.0,<2.0.1 depends on pydantic>=2.0b3.
    And because pydantic-settings>=2.0.1,<=2.0.3 depends on pydantic>=2.0.1, we can conclude that
    pydantic-settings>=2.0.0,<2.1.0 depends on pydantic>=2.0b3.
    And because pydantic-settings>=2.1.0,<=2.2.1 depends on pydantic>=2.3.0 and pydantic>=2.7.0, we
    can conclude that pydantic-settings>=2.0.0 depends on pydantic>=2.0b3.
    And because your project depends on pydantic<2 and pydantic-settings>=2, we can conclude that
    your project's requirements are unsatisfiable.
help: If you want to add the package regardless of the failed resolution, provide the `--frozen` flag
      to skip locking and syncing.
This failure protects the development environment. uv refuses to install a broken state.
Abstract vs. Concrete Dependencies
We now resolve the conflict by allowing the solver to select the latest compatible versions (removing the manual version pins).
This brings us to a critical distinction in Python packaging:
-
Abstract Dependencies (
pyproject.toml): These define the minimum requirements for the project. For a library likechemlib, we prefer loose constraints (e.g.,metatrain>=0.1.0) to maximize compatibility with other packages. -
Concrete Dependencies (
uv.lock): This file records the exact resolution (e.g.,metatrain==0.1.5,torch==2.1.0) used in development. It ensures reproducibility.
The lockfile guarantees that all developers operate on an identical atomic substrate, eliminating the “works on my machine” class of defects.
- pyproject.toml is the standard recipe for Python projects (PEP 621).
- uv add manages dependencies and ensures reproducibility via uv.lock.
- uv run executes code in an isolated, editable environment without manual activation.
-
Isolation:
uvenforces a clean environment, preventing accidental usage of unlisted packages. -
Manifest vs. Lock:
pyproject.tomldeclares what we need;uv.lockrecords exactly what we installed.
condaarrives here↩︎This solves the “chicken and egg” problem of needing tools to install tools↩︎
A universal lockfile standard remains elusive; tools like
pdmandpoetrystart providing specific implementations.↩︎Allows single-file scripts to declare their own dependencies.↩︎
For compiled code, this will need to be switched out with
meson-python,setuptools, orscikit-buildto handle C++/Fortran code.↩︎the flat layout has some drawbacks related to testing, though the Hitchhiker’s guide disagrees↩︎
adapted from the
uvPyCon 2025 tutorial↩︎
Content from Quality Assurance: Testing and Linting
Last updated on 2026-02-11 | Edit this page
Overview
Questions
- How do I keep development tools separate from my library dependencies?
- How can I automatically fix style errors?
- How do I ensure my code works as expected?
- What are pre-commit hooks?
Objectives
- Use
uv add --devto install tools for developers (linting, testing). - Configure
ruffto format code and catch bugs. - Write and run a simple test suite with
pytest. - Automate checks using
prek.
The “Works on My Machine” Problem (Again)
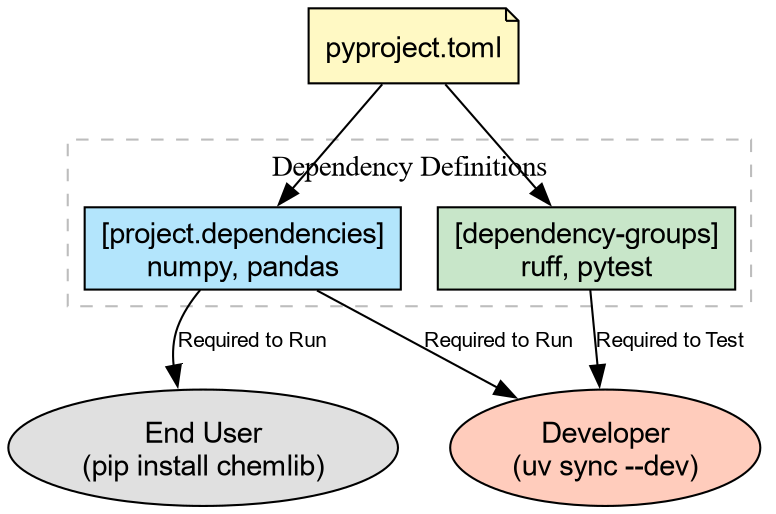
We have a pyproject.toml that defines
what our package needs to run (e.g., numpy).
But as developers, we need more tools. We need tools to:
- Format code (so it looks professional).
- Lint code (to catch bugs before running).
- Test code (to verify correctness).
We don’t want to force our users to install these tools just to use our library. We need Development Dependencies.
Development Dependencies with uv
We will use uv to add tools to a
special dev group. This keeps them
separate from the main dependencies.
BASH
# Add Ruff (linter), Pytest (testing), and plugins for coverage/randomization
uv add --dev ruff pytest pytest-cov pytest-randomly
This updates pyproject.toml:
Linting and Formatting with ruff
Ruff is an
extremely fast static analysis tool that replaces older tools like
flake8 (linting), black (formatting), and isort (sorting imports).
Let’s see how messy our code is. Open src/chemlib/geometry.py and make it “ugly”: add
some unused imports or bad spacing.
PYTHON
# src/chemlib/geometry.py
import os  # Unused import!
import numpy as np

def center_of_mass(atoms):
    x = 1    # Unused variable!
    print("Calculating...")
    data = np.array(atoms)
    return np.mean(data, axis=0)
Now, run the linter:
src/chemlib/geometry.py:2:8: F401 [*] =os= imported but unused
src/chemlib/geometry.py:6:5: F841 [*] Local variable =x= is assigned to but never used
Found 2 errors.
ruff found code-smell. Now let’s fix
the formatting automatically:
Your code is now perfectly spaced and sorted according to community standards.
Testing with pytest
Now that the code looks right, does it work right?
We need to write a test. By convention, tests live in a tests/ directory at the root of your
project.
BASH
mkdir tests
# Create __init__.py to allow relative imports within the tests directory
touch tests/__init__.py
Create a test file tests/test_geometry.py:
SH
import numpy as np
import pytest
from chemlib.geometry import center_of_mass

def test_center_of_mass_simple():
    """Test COM of a simple diatomic molecule."""
    atoms = [[0, 0, 0], [2, 0, 0]]
    expected = [1.0, 0.0, 0.0]

    result = center_of_mass(atoms)

    # Use numpy's assertion helper for float comparisons
    np.testing.assert_allclose(result, expected)

def test_center_of_mass_cube():
    """Test COM of a unit cube."""
    atoms = [
        [0,0,0], [1,0,0], [0,1,0], [0,0,1],
        [1,1,0], [1,0,1], [0,1,1], [1,1,1]
    ]
    expected = [0.5, 0.5, 0.5]
    result = center_of_mass(atoms)
    np.testing.assert_allclose(result, expected)
Run the tests using uv run. We include
the --cov flag (from pytest-cov) to see which lines of code our tests
executed:
tests/test_geometry.py ..                                            [100%]

---------- coverage: platform linux, python 3.14 ----------
Name                        Stmts   Miss  Cover
-----------------------------------------------
src/chemlib/__init__.py         0      0   100%
src/chemlib/geometry.py         4      0   100%
-----------------------------------------------
TOTAL                           4      0   100%

========================== 2 passed in 0.04s ==========================
Why did this work?
Because of the Src Layout established earlier, uv run installs the package in editable mode.
pytest imports chemlib as if it existed as a standard installed
library.
Challenge: Break the Test
Modify src/chemlib/geometry.py to
introduce a bug (e.g., divide by len(data) - 1 instead of the true mean).
- Run
uv run pytest. What happens? - Run
uv run ruff check. Does the linter catch this logic error?
-
Pytest Fails: It will show exactly where the
numbers mismatch (
AssertionError). - Ruff Passes: Linters check syntax and style, not logic. This is why we need both!
Automating best practices

We have tools, but we have to remember to run them.
pre-commit hooks automate this by running checks
before you can commit code. We will use prek, a
Rust rewrite of the venerable pre-commit.
First, add it to our dev tools:
Create a configuration file .pre-commit-config.yaml in the root
directory:
SH
repos:
  - repo: https://github.com/astral-sh/ruff-pre-commit
    rev: v0.1.0
    hooks:
      - id: ruff
        args: [ --fix ]
      - id: ruff-format
Now, run the hook:
.. and finally install the action as a git hook
prek installed at .git/hooks/pre-commitNow, try to commit messy code. git will
stop you, run ruff, fix the file, and ask
you to stage the clean file. You can no longer commit ugly code by
accident!
-
Development Dependencies (
uv add --dev) keep tools like linters separate from library requirements. - Ruff is the modern standard for fast Python linting and formatting.
- Pytest verifies code correctness; Src Layout makes test discovery reliable.
- Pre-commit hooks ensure no bad code ever enters your version control history.
Last updated on 2026-02-15 | Edit this page
Overview
Questions
- How do I manage release notes without merge conflicts?
- How do I publish my package to the world (safely)?
Objectives
- Use
towncrierto manage changelogs using fragments. - Build package artifacts using
uv build. - Publish packages to TestPyPI using
uvx twine.
The Changelog Problem
Before we publish code, we need to tell our users what changed. The
naive way is to edit a CHANGELOG.md file
manually. The Problem: If two people define a new
feature in a Pull Request, they both edit the top of CHANGELOG.md. This causes Merge
Conflicts.
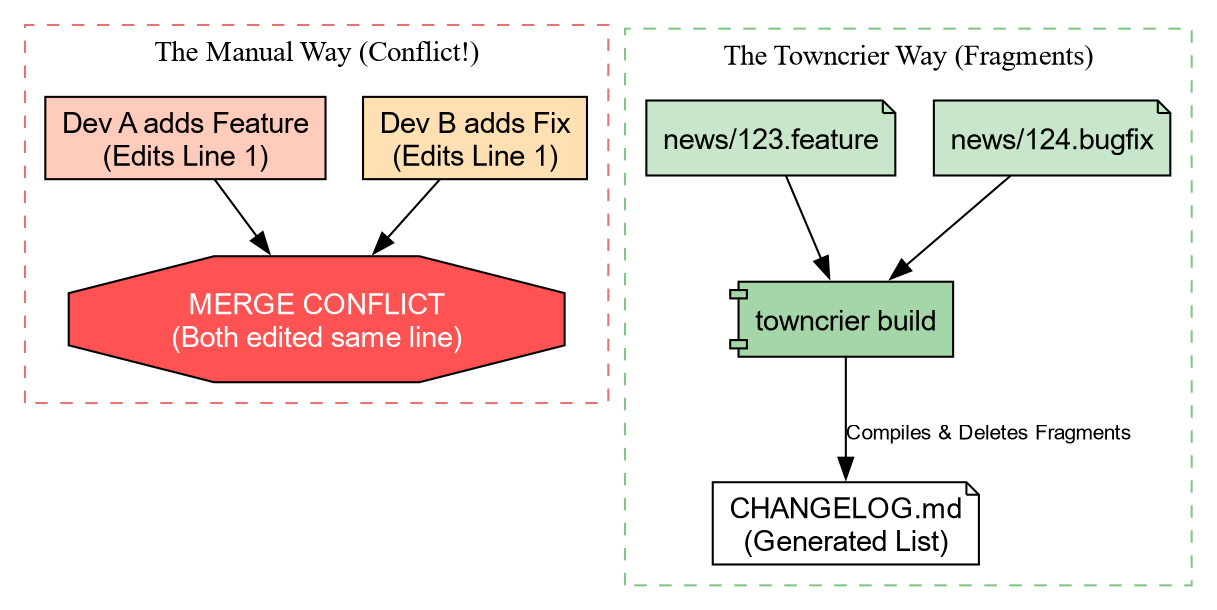
Solution: Towncrier
Towncrier solves this by using “News Fragments”. Instead of editing one big file, you create a tiny file for each change.
Let’s set it up.
Add the configuration to pyproject.toml:
Now, create the news directory:
Creating a News Fragment
Imagine we just added the center_of_mass function. We create a file in
news/. The name must end with the type of
change (.feature, .bugfix, .doc).
When we are ready to release, we run:
Towncrier will:
- Collect all files in
news/. - Format them into a bulleted list.
- Prepend them to
CHANGELOG.md. - Delete the fragment files.
No merge conflicts, ever!
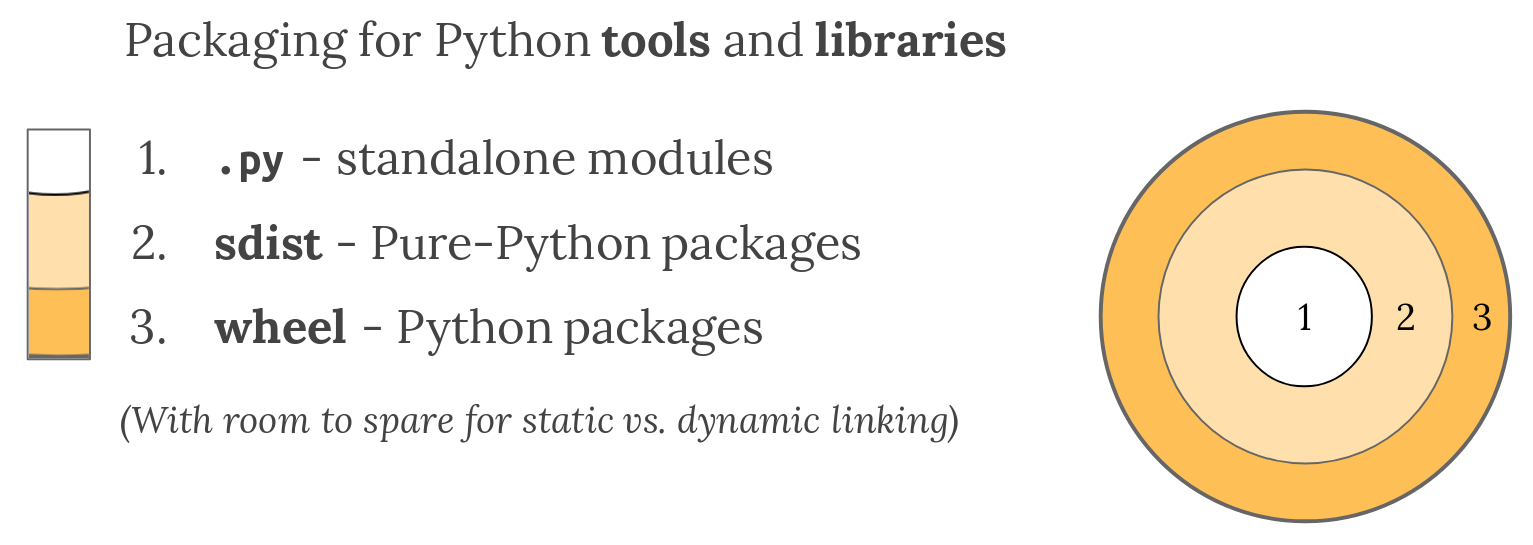
Building Artifacts
Now that our docs are ready, we need to package our code. Python uses two formats:
- sdist (.tar.gz): The raw source code.
- Wheel (.whl): A pre-built, ready-to-install archive.
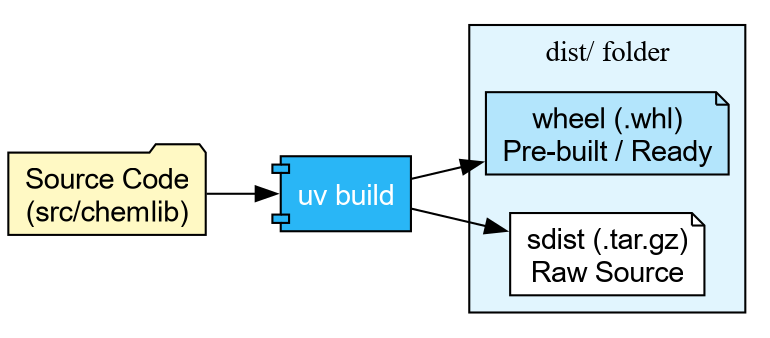
With uv, building is trivial:
Building source distribution...
Building wheel...
Successfully built dist/chemlib-0.1.0.tar.gz and dist/chemlib-0.1.0-py3-none-any.whl
Publishing to TestPyPI
We are finally ready to ship.


Warning: The real PyPI is permanent. For this workshop, we use TestPyPI (test.pypi.org), which is a separate repository. By default, PyPI is used for resolution.
Step 1: Get a Token
- Go to TestPyPI and create an account.
- Go to Settings -> API Tokens -> Create “Entire account” token.
- Copy the token (starts with
pypi-).
Step 2: Upload using Twine We don’t need to install
twine permanently. We can use uvx (the tool execution runner) to fetch and run
it in one go.
BASH
# Replace __token__ with your actual token value
uvx twine upload \
    --repository testpypi \
    --username __token__ \
    --password pypi-AgENdGVzdC5we... \
    dist/*
If successful, you can now see your package on the TestPyPI website, and can be installed with
Challenge: The Full Cycle
You have built the artifact. Now prove it works!
Upload your package to TestPyPI using the credentials you generated.
Create a one-line script check_install.py: import chemlib; print(chemlib.file).
Use uv run to execute this script, but
force it to install your package from TestPyPI.
TestPyPI is a separate “index” (a library catalog). You will need to
tell uv where to look using the flag --extra-index-url https://test.pypi.org/simple/.
We use “extra” so it can still find dependencies like numpy on the main PyPI.
- Upload:
- Verify: We use
--with chemlibto request an ephemeral environment containing our package.
BASH
echo "import chemlib; print('Success:', chemlib.file)" > check_install.py
uv run --extra-index-url https://test.pypi.org/simple/ --with chemlib check_install.py
Output:
Success: .../uv/.../site-packages/chemlib/init.pyAutomating Release (GitHub Actions)
Warning: This may not be a good
idea, since PyPI releases cannot be removed. It is better to
set this up for TestPyPI and manually use twine or uv or
pdm publish and others locally after
ensuring everything works.
We can teach GitHub to do this for us. We use Trusted Publishing (OIDC) so we don’t even need to copy-paste passwords. The CI episode will cover GitHub Actions in full detail; for now, here is a preview of what an automated release job looks like:
YAML
release:
  needs: check
  if: github.event_name == 'push' && startsWith(github.ref, 'refs/tags/v')
  runs-on: ubuntu-latest
  permissions:
    id-token: write  # Required for OIDC
    contents: read

  steps:
    - uses: actions/checkout@v4
    - uses: astral-sh/setup-uv@v5

    - name: Build
      run: uv build

    - name: Publish to TestPyPI
      uses: pypa/gh-action-pypi-publish@release/v1
      with:
        repository-url: https://test.pypi.org/legacy/
        # No password needed if configured in PyPI settings!
Now, whenever you push a tag (e.g., v0.1.0), GitHub will build and ship your code
automatically.
- Towncrier prevents changelog conflicts by using “News Fragments”.
-
uv build creates standard
sdistandwheelartifacts. - uvx twine allows one-off publishing without polluting your environment.
- TestPyPI is the sandbox for practicing release engineering.
Content from If It Isn't Documented, It Doesn't Exist
Last updated on 2026-02-15 | Edit this page
Overview
Questions
- How do I generate professional documentation for my Python package?
- What are docstrings, and how do they become web pages?
- How do I link my documentation to other projects like NumPy?
Objectives
- Write NumPy-style docstrings for functions and modules.
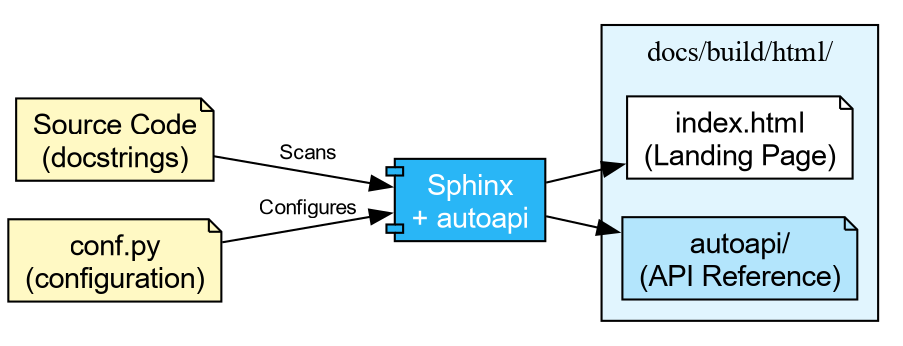
- Configure
Sphinxwithautoapito generate an API reference automatically. - Build HTML documentation locally and verify it.
- Deploy documentation to the web using GitHub Pages.
The Documentation Gap
Our chemlib package now has tests, a
changelog, and a release pipeline. A collaborator can install it from
TestPyPI with a single command. But when they type import chemlib, how do they know what functions
are available? What arguments does center_of_mass expect? What does it return?
Without documentation, the only option is to read the source code. That works for you (the author), but it does not scale. New users, reviewers, and your future self all benefit from a browsable, searchable reference.
Writing Good Docstrings
The foundation of automated documentation is the
docstring: a string literal that appears as the first
statement of a function, class, or module. Python stores it in the __doc__ attribute, and tools like Sphinx extract
it to build reference pages.
The NumPy docstring style is the most common in scientific Python.
Let’s update src/chemlib/geometry.py with
proper docstrings:
SH
import numpy as np


def center_of_mass(atoms):
    """Calculate the geometric center of mass of a set of atoms.

    Parameters
    ----------
    atoms : list of list of float
        A list of 3D coordinates, where each element is ``[x, y, z]``.

    Returns
    -------
    numpy.ndarray
        The mean position as a 1D array of shape ``(3,)``.

    Examples
    --------
    >>> center_of_mass([[0, 0, 0], [2, 0, 0]])
    array([1., 0., 0.])
    """
    data = np.array(atoms)
return np.mean(data, axis=0)Challenge: Document a Second Function
Imagine you add a helper function distance to chemlib/geometry.py that computes the Euclidean
distance between two points. Write a complete NumPy-style docstring for
it.
Your docstring should include:
- A one-line summary.
- A
Parameterssection with types. - A
Returnssection. - An
Examplessection.
PYTHON
def distance(r_a, r_b):
    """Compute the Euclidean distance between two points.

    Parameters
    ----------
    r_a : array_like
        Coordinates of the first point, shape ``(n,)``.
    r_b : array_like
        Coordinates of the second point, shape ``(n,)``.

    Returns
    -------
    float
        The Euclidean distance between ``r_a`` and ``r_b``.

    Examples
    --------
    >>> distance([0.0, 0.0, 0.0], [1.0, 1.0, 1.0])
    1.7320508075688772
    """
    data_a = np.array(r_a)
    data_b = np.array(r_b)
    return float(np.linalg.norm(data_a - data_b))
Setting Up Sphinx
Sphinx is the standard documentation generator in the Python ecosystem. It reads source files (reStructuredText or Markdown), follows imports into your package, and produces HTML, PDF, or ePub output.
We will use a dependency group (introduced in the
pyproject.toml episode) to keep
documentation tools separate from runtime and dev dependencies:
This creates a docs group in pyproject.toml:
TOML
[dependency-groups]
dev = ["ruff>=0.1.0", "pytest>=8.0.0"]
docs = ["sphinx>=8.0", "sphinx-autoapi>=3.0", "shibuya>=2024.0"]
Now initialise the documentation skeleton:
Create the Sphinx configuration file docs/source/conf.py:
SH
import os
import sys

# -- Path setup --------------------------------------------------------------
sys.path.insert(0, os.path.abspath("../../src"))

# -- Project information -----------------------------------------------------
project = "chemlib"
author = "Your Name"

# -- Extensions --------------------------------------------------------------
extensions = [
    "autoapi.extension",       # Auto-generates API pages from source
    "sphinx.ext.viewcode",     # Adds [source] links to API docs
    "sphinx.ext.intersphinx",  # Cross-links to NumPy, Python docs
]

# -- AutoAPI -----------------------------------------------------------------
autoapi_dirs = ["../../src"]   # Where to find the package source
autoapi_type = "python"

# -- Intersphinx -------------------------------------------------------------
intersphinx_mapping = {
    "python": ("https://docs.python.org/3", None),
    "numpy": ("https://numpy.org/doc/stable", None),
}

# -- Theme -------------------------------------------------------------------
html_theme = "shibuya"
What Each Extension Does
autoapi-
Scans your
src/directory and builds API reference pages for every module, class, and function. You do not need to write.rstfiles by hand. viewcode- Adds “\[source\]” links next to each documented object, letting readers jump to the implementation.
intersphinx-
Enables cross-project linking. When you write
:class:\`numpy.ndarray\`in a docstring, Sphinx automatically links to the NumPy documentation.
Finally, create a minimal docs/source/index.rst:
Building the Documentation
With everything in place, build the HTML output:
...
[autoapi] Reading files with sphinx-autoapi
[autoapi] Found package: chemlib
...
build succeeded.

The HTML pages are in docs/build/html.
Open docs/build/html/index.html in your
browser. You should see a clean site with an “API Reference” section
listing every function and its docstring.
Challenge: The Missing Docstring
- Open the generated API reference page in your browser.
- Find a function that has no docstring (or only a placeholder).
- Add a proper NumPy-style docstring to it in the source code.
- Rebuild with the
sphinx-buildcommand above. - Refresh the page and verify the docstring appears.
Deploying to the Web
Building locally is useful during development, but you ultimately want the documentation available online. The most common approach in the Python ecosystem is GitHub Pages, deployed automatically via GitHub Actions.
The next episode covers Continuous Integration in detail. For now, the key idea is that GitHub Actions can run commands automatically when you push code. The pattern for documentation deployment is:
-
Build: Check out the code, install the
docsgroup, runsphinx-build. - Upload: Save the built HTML as a workflow artifact.
-
Deploy: On pushes to
main, publish the artifact to GitHub Pages.
SH
name: Documentation

concurrency:
  group: "pages"
  cancel-in-progress: true

on:
  push:
    branches: [main]
  pull_request:

jobs:
  docs:
    runs-on: ubuntu-latest
    permissions:
      contents: write

    steps:
      - uses: actions/checkout@v4
        with:
          fetch-depth: 0

      - uses: astral-sh/setup-uv@v5

      - name: Install dependencies
        run: uv sync --group docs

      - name: Build documentation
        run: uv run sphinx-build -b html docs/source docs/build/html

      - name: Upload artifact
        uses: actions/upload-artifact@v4
        with:
          name: documentation
          path: docs/build/html

      - name: Deploy to GitHub Pages
        if: github.event_name == 'push' && github.ref == 'refs/heads/main'
        uses: peaceiris/actions-gh-pages@v4
        with:
          github_token: ${{ secrets.GITHUB_TOKEN }}
publish_dir: docs/build/htmlOn pull requests the workflow builds the documentation and reports success or failure, but does not deploy. This ensures broken docs never reach the live site, while still catching build errors before merge.
PR Previews
Catching a broken build is useful, but what about visual regressions—a mangled table, a missing image, or a heading that renders wrong? You cannot tell from a green checkmark alone.
A PR preview solves this: a second workflow waits for the docs build to finish, then posts a comment on the Pull Request with a link to a temporary hosted copy of the HTML output. Reviewers can click the link and see exactly what the documentation will look like before merging.

Add this second workflow file .github/workflows/pr_comment.yml:
SH
name: Comment on pull request

on:
  workflow_run:
    workflows: ["Documentation"]
    types: [completed]

jobs:
  pr_comment:
    if: >-
      github.event.workflow_run.event == 'pull_request' &&
      github.event.workflow_run.conclusion == 'success'
    runs-on: ubuntu-latest
    permissions:
      pull-requests: write
      issues: write
      actions: read

    steps:
      - uses: HaoZeke/doc-previewer@v0.0.1
        with:
          workflow_run_id: ${{ github.event.workflow_run.id }}
          head_sha: ${{ github.event.workflow_run.head_sha }}
          artifact_name: documentation
This uses a workflow_run trigger, which
means it only fires after docs.yml completes. The two-workflow pattern is
a deliberate security measure: the build workflow runs with the PR
author’s (limited) permissions, while the comment workflow runs with
write access to post on the PR. This prevents a malicious PR from using
elevated permissions during the build step.
-
Yes. Sphinx resolves the
:class:\`numpy.ndarray\`role using the intersphinx inventory downloaded fromnumpy.org. - The link points to
https://numpy.org/doc/stable/reference/generated/numpy.ndarray.html.
This works because we configured intersphinx_mapping with the NumPy docs URL in
conf.py. Sphinx fetches a small inventory
file (objects.inv) from that URL at build
time and uses it to resolve cross-references.
-
Docstrings are the raw material for documentation.
Use the NumPy style (
Parameters,Returns,Examples) for scientific code. -
Sphinxwithautoapigenerates a complete API reference by scanning your source code, requiring no manual.rstfiles per module. -
intersphinxenables cross-project links (e.g., to NumPy, Python), making your documentation part of the broader ecosystem. - Documentation builds can be automated with GitHub Actions and
deployed to GitHub Pages on every push to
main. - PR Previews let reviewers see documentation changes visually before merging, catching formatting issues that a green checkmark cannot.
Content from The Gatekeeper: Continuous Integration
Last updated on 2026-02-15 | Edit this page
Overview
Questions
- What happens if I forget to run the tests before pushing?
- How do I ensure my code works on Windows, Linux, and macOS?
- How do I automate
uvin the cloud?
Objectives
- Create a GitHub Actions workflow file that lints and tests on every push.
- Configure the
astral-sh/setup-uvaction for cached, high-performance CI. - Define a test matrix to validate code across multiple Python versions and operating systems.
- Connect CI to the release pipeline from the Release Engineering episode.
The Limits of Local Hooks
In the Quality Assurance episode, we installed prek to run ruff
before every commit. That is a good first line of defence, but it has
gaps:
- A collaborator can bypass hooks with
git commit --no-verify. - Hooks only run on your machine, with your operating system and Python version.
- If it works on your MacBook but breaks on a colleague’s Linux cluster, you will not find out until they complain.
Continuous Integration (CI) closes these gaps by
running your test suite on a neutral server every time code is pushed.
It is the “gatekeeper” that protects the main branch.

Anatomy of a Workflow File
GitHub Actions reads YAML files from .github/workflows/. Each file describes
when to run (on),
what machine to use (runs-on), and what commands to
execute (steps).
Let’s create our gatekeeper. Start by making the directory:
Now create .github/workflows/ci.yml
with the following content. This mirrors exactly what we did locally in
the Quality Assurance episode: lint, then test.
SH
name: CI

on:
  push:
    branches: [main]
  pull_request:

jobs:
  check:
    name: Lint and Test
    runs-on: ubuntu-latest
    steps:
      - name: Checkout Code
        uses: actions/checkout@v4

      - name: Install uv
        uses: astral-sh/setup-uv@v5
        with:
          enable-cache: true

      - name: Set up Python
        run: uv python install 3.12

      - name: Install Dependencies
        run: uv sync --all-extras --dev

      - name: Lint
        run: uv run ruff check .

      - name: Format Check
        run: uv run ruff format --check .

      - name: Test
run: uv run pytest --cov=srcThe astral-sh/setup-uv action installs
uv and (with enable-cache: true) caches the downloaded
packages between runs. This makes subsequent CI runs significantly
faster than a fresh install each time.
Challenge: Reading the Workflow
Before we push anything, make sure you understand the structure. Answer the following:
- Which event triggers this workflow on a pull request?
- What operating system does the job run on?
- Why do we use
ruff format --checkinstead ofruff format?
- The
pull_requesttrigger (underon:) fires whenever a PR is opened or updated against any branch. -
ubuntu-latest(a Linux virtual machine hosted by GitHub). -
--checkexits with an error if files would be reformatted, without actually modifying them. In CI we want to detect problems, not silently fix them. The developer should runruff formatlocally and commit the result.
The Test Matrix
The workflow above runs on one OS with one Python version. That is better than nothing, but one of the biggest risks in scientific Python is compatibility.
- A script might work on Linux but fail on Windows due to path
separators (
/vs\). - Code might work on Python 3.12 but fail on 3.11 because it uses a
feature added in 3.12 (like
typestatement syntax). - A filename like
aux.pyis perfectly legal on Linux but reserved on Windows.
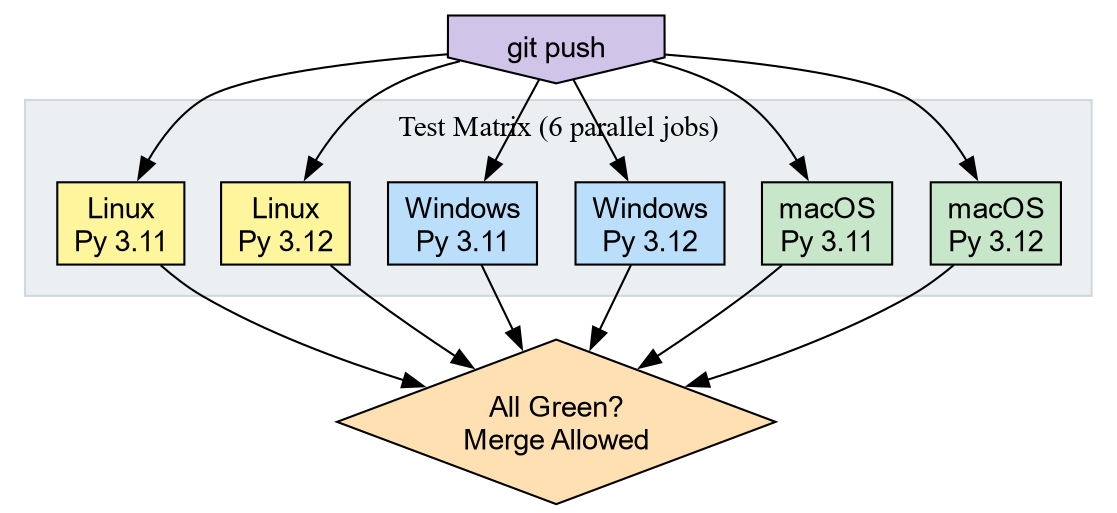
A Matrix Strategy tells GitHub to run the same job across every combination of parameters. We define the axes (Python versions, operating systems) and GitHub spins up one runner per combination.
Replace the jobs: block in your ci.yml with the version below. The steps remain identical; only the job header
changes.
SH
name: CI

on:
  push:
    branches: [main]
  pull_request:

jobs:
  check:
    name: Test on ${{ matrix.os }} / Py ${{ matrix.python-version }}
    runs-on: ${{ matrix.os }}
    strategy:
      fail-fast: false
      matrix:
        python-version: ["3.11", "3.12"]
        os: [ubuntu-latest, windows-latest, macos-latest]

    steps:
      - uses: actions/checkout@v4

      - uses: astral-sh/setup-uv@v5
        with:
          enable-cache: true

      - name: Install Python ${{ matrix.python-version }}
        run: uv python install ${{ matrix.python-version }}

      - name: Install Dependencies
        run: uv sync --all-extras --dev

      - name: Lint
        run: uv run ruff check .

      - name: Format Check
        run: uv run ruff format --check .

      - name: Test
        run: uv run pytest --cov=src
Two Python versions times three operating systems gives six parallel jobs. If any single job fails, the Pull Request is blocked.

Windows uses backslash (
\) as the path separator. A hardcoded forward slash string will not resolve correctly on Windows.-
Use
pathlib.Path: The very first episode (Writing Reproducible Python), where we introduced
pathlibfor cross-platform file handling.
Connecting CI to Releases
In the Release Engineering episode, we manually uploaded artifacts to
TestPyPI with uvx twine. We also previewed
an automated release job. Now that we understand how workflows are
structured, let’s see the complete picture.
Add a second job to the same ci.yml
file. This job only runs when you push a version tag (e.g., v0.1.0) and only after the test
matrix passes.
YAML
release:
  needs: check
  if: github.event_name == 'push' && startsWith(github.ref, 'refs/tags/v')
  runs-on: ubuntu-latest
  permissions:
    id-token: write
    contents: read

  steps:
    - uses: actions/checkout@v4
    - uses: astral-sh/setup-uv@v5

    - name: Build
      run: uv build

    - name: Publish to TestPyPI
      uses: pypa/gh-action-pypi-publish@release/v1
      with:
        repository-url: https://test.pypi.org/legacy/
Key details:
needs: check- The release job waits for all six matrix jobs to pass. A broken build is never published.
id-token: write- Enables OIDC Trusted Publishing. GitHub proves its identity to PyPI directly, so you never need to store an API token as a secret.
- The tag filter
-
Only tags starting with
v(likev0.1.0) trigger the release. Normal pushes tomainrun tests but do not publish.
Challenge: The Release Workflow
Walk through the following scenario:
- You merge a pull request to
main. Does thereleasejob run? - You tag the merge commit with
git tag v0.2.0andgit push --tags. What happens now? - Imagine the
windows-latest / Py 3.11job fails. Does the release still happen?
-
No. The
if:condition requires the ref to start withrefs/tags/v. A push tomaindoes not match. - The tag push triggers CI. All six matrix jobs run. If they pass, the
releasejob runs: it builds the wheel and sdist, then publishes to TestPyPI via OIDC. -
No. The
needs: checkdependency means thereleasejob is skipped when any matrix job fails. The tag remains, and you can re-trigger after fixing the issue.
- Continuous Integration runs your test suite on a neutral server on every push, catching problems that local hooks miss.
-
astral-sh/setup-uvprovides a cached, high-performanceuvenvironment in GitHub Actions. - A Matrix Strategy tests across multiple operating systems and Python versions in parallel.
- CI can gate releases: the
releasejob usesneeds:to ensure tests pass before publishing.
Content from Compiled Extensions: The Shared Object Pipeline
Last updated on 2026-02-12 | Edit this page
Overview
Questions
- How does the Python ecosystem deliver high-performance binaries to users?
- What distinguishes a “Source Distribution” from a “Binary Wheel”?
- What role does
cibuildwheelplay in software distribution?
Objectives
- Construct a Python extension module from a Fortran kernel using Meson.
- Configure a build-backend for compiled extensions using
meson-python. - Setup a CI pipeline to generate binary wheels for distribution.
The Shared Object Reality
In the domain of scientific Python, “packaging” often refers
effectively to “binary distribution.” When users install libraries such
as numpy, torch, or openblas, they typically download compiled
artifacts rather than pure Python scripts.
Investigation of the site-packages directory reveals
that the core logic resides in Shared Object files
(.so on Linux, .dylib on macOS,
.dll on Windows). Python functions primarily as the
interface.
To distribute high-performance code effectively, one must master the pipeline that generates these artifacts consisting of
- Translation
- Generating C wrappers for Fortran/C++ code.
- Compilation
- Transforming source code into shared objects.
- Bundling
-
Packaging shared objects into Wheels (
.whl).
The Computational Kernel in Fortran
We begin with a computational kernel. In physical chemistry, calculating the Euclidean distance between atomic coordinates constitutes a fundamental operation.
Create src/chemlib/geometry.f90:
F90
subroutine calc_distance(n, r_a, r_b, dist)
implicit none
integer, intent(in) :: n
real(8), intent(in), dimension(n) :: r_a, r_b
real(8), intent(out) :: dist
!f2py intent(hide) :: n
!f2py intent(in) :: r_a, r_b
!f2py intent(out) :: dist
integer :: i
dist = 0.0d0
do i = 1, n
dist = dist + (r_a(i)-r_b(i))**2
end do
dist = sqrt(dist)
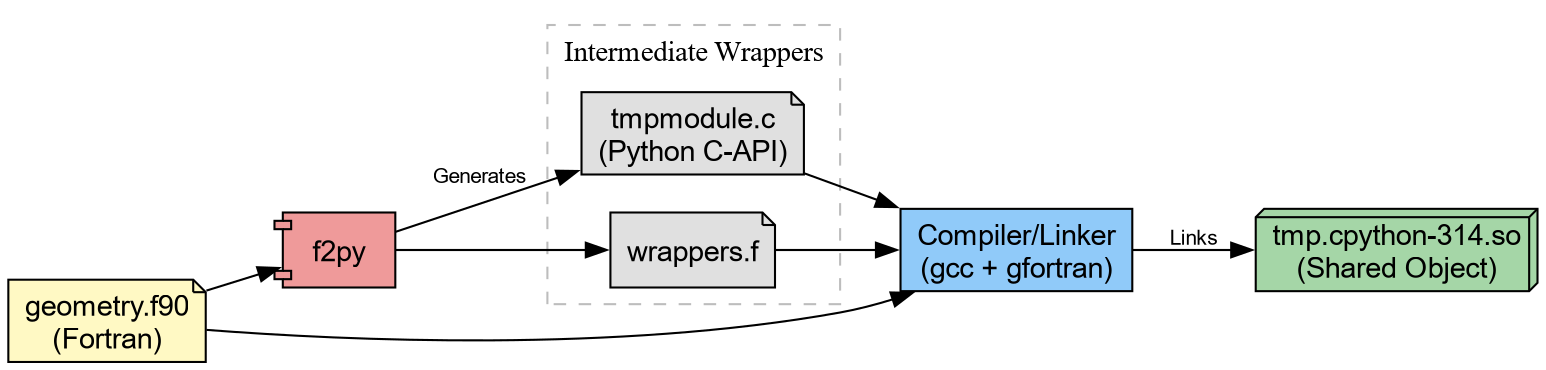
end subroutine calc_distanceThis can be immediately compiled through f2py.
Which generates tmp.cpython*.so (or .dll on
Windows). We can try this out.
PYTHON
❯ python
Python 3.14.2 (main, Jan  2 2026, 14:27:39) [GCC 15.2.1 20251112] on linux
Type "help", "copyright", "credits" or "license" for more information.
>>> import tmp
>>> tmp.calc_distance([0.,0.,0.], [1.,1.,1.])
1.7320508075688772Challenge: Validate the result
Can you make sure the results are correct? Note that since we cannot
really “install” the package yet, a simple assert will have to do.
Considering “installable” variants with meson
The problem with the setup so far is that the
compiled extension doesn’t get “installed” into site-packages. To work around this, it helps to
first take a look behind the curtain. f2py with the
--build-dir option will output the intermediate build
files.
BASH
❯ f2py -c geometry.f90 -m tmp --build-dir tmp_out
Cannot use distutils backend with Python>=3.12, using meson backend instead.
Using meson backend
Will pass --lower to f2py
See https://numpy.org/doc/stable/f2py/buildtools/meson.html
Reading fortran codes...
    Reading file 'geometry.f90' (format:free)
Post-processing...
  character_backward_compatibility_hook
Post-processing (stage 2)...
Building modules...
    Building module "tmp"...
    Generating possibly empty wrappers"
    Maybe empty "tmp-f2pywrappers.f"
        Constructing wrapper function "calc_distance"...
          dist = calc_distance(r_a,r_b)
    Wrote C/API module "tmp" to file "./tmpmodule.c"
The Meson build system
Version: 1.10.1
Source dir: /home/rgoswami/Git/Github/epfl/pixi_envs/teaching/python_packaging_workbench/python_packaging_workbench/org_src/episodes/data/chemlib/src/chemlib/tmp_out
Build dir: /home/rgoswami/Git/Github/epfl/pixi_envs/teaching/python_packaging_workbench/python_packaging_workbench/org_src/episodes/data/chemlib/src/chemlib/tmp_out/bbdir
Build type: native build
Project name: tmp
Project version: 0.1
Fortran compiler for the host machine: gfortran (gcc 15.2.1 "GNU Fortran (GCC) 15.2.1 20260103")
Fortran linker for the host machine: gfortran ld.bfd 2.45.1
C compiler for the host machine: cc (gcc 15.2.1 "cc (GCC) 15.2.1 20260103")
C linker for the host machine: cc ld.bfd 2.45.1
Host machine cpu family: x86_64
Host machine cpu: x86_64
Program /usr/bin/python found: YES (/usr/bin/python)
Found pkg-config: YES (/usr/bin/pkg-config) 2.5.1
Build targets in project: 1

Found ninja-1.13.2 at /usr/bin/ninja
INFO: autodetecting backend as ninja
INFO: calculating backend command to run: /usr/bin/ninja -C /home/rgoswami/Git/Github/epfl/pixi_envs/teaching/python_packaging_workbench/python_packaging_workbench/org_src/episodes/data/chemlib/src/chemlib/tmp_out/bbdir
ninja: Entering directory `/home/rgoswami/Git/Github/epfl/pixi_envs/teaching/python_packaging_workbench/python_packaging_workbench/org_src/episodes/data/chemlib/src/chemlib/tmp_out/bbdir'
[7/7] Linking target tmp.cpython-314-x86_64-linux-gnu.so
Which we can then inspect..
The intermediate involves a meson.build !
project('tmp',
        ['c', 'fortran'],
        version : '0.1',
        meson_version: '>= 1.1.0',
        default_options : [
                            'warning_level=1',
                            'buildtype=release'
                          ])
fc = meson.get_compiler('fortran')

py = import('python').find_installation('''/usr/bin/python''', pure: false)
py_dep = py.dependency()

incdir_numpy = run_command(py,
  ['-c', 'import os; os.chdir(".."); import numpy; print(numpy.get_include())'],
  check : true
).stdout().strip()

incdir_f2py = run_command(py,
    ['-c', 'import os; os.chdir(".."); import numpy.f2py; print(numpy.f2py.get_include())'],
    check : true
).stdout().strip()

inc_np = include_directories(incdir_numpy)
np_dep = declare_dependency(include_directories: inc_np)

incdir_f2py = incdir_numpy / '..' / '..' / 'f2py' / 'src'
inc_f2py = include_directories(incdir_f2py)
fortranobject_c = incdir_f2py / 'fortranobject.c'

inc_np = include_directories(incdir_numpy, incdir_f2py)
# gh-25000
quadmath_dep = fc.find_library('quadmath', required: false)

py.extension_module('tmp',
                     [
                     '''geometry.f90''',
                     '''tmpmodule.c''',
                     '''tmp-f2pywrappers.f''',
                     fortranobject_c
                     ],
                     include_directories: [
                     inc_np,
                     ],
                     objects: [
                     ],
                     dependencies : [
                     py_dep,
                     quadmath_dep,
                     ],
                     install : true)
We could take inspiration from this, generate sources, and link them together:
f2py_prog = find_program('f2py')
# Generate Wrappers
geometry_source = custom_target('geometrymodule.c',
  input : ['src/chemlib/geometry.f90'],
  output : ['geometrymodule.c', 'geometry-f2pywrappers.f'],
  command : [f2py_prog, '-m', 'geometry', '@INPUT@', '--build-dir', '@OUTDIR@']
)
A pattern commonly used in SciPy for instance. Here we will consider
a less tool-heavy approach though build backends such as meson-python, scikit-build-core, and setuptools orchestrate complex builds.
The “Manual” Install
For now, let’s consider falling back to what we learned about installation.
Challenge: The Site-Packages Hack
Your goal: Make the tmp module importable from anywhere
in your system (within the current environment), not just the source
folder.
Locate the active site-packages directory for your
current environment.
Copy the compiled .so (or .pyd) file into
that directory.
Change your directory to $HOME (to ensure you do not
import the local file).
Launch Python and attempt to import tmp.
This manual exercise mimics exactly how libraries like openblas, metatensor, and torch operate. If you examine their installed
folders, you will find large compiled shared objects.
The Python files (__init__.py) serve
mostly as wrappers to load these binary blobs. For example, a robust
package might look like this:
PYTHON
try:
    from . import _geometry_backend
except ImportError:  # Logic to handle missing binaries or wrong platforms
    raise ImportError("Could not load the compiled extension!")


def calc_distance(a, b):  # Pure Python type checking before passing to Fortran
    return _geometry_backend.calc_distance(a, b)
The Wheelhouse
We now possess a working shared object. However, a critical flaw remains: Portability.
The .so file you just generated links against:
- The specific version of Python on your machine.
- The system C library (glibc) on your machine.
- The CPU architecture (x8664, ARM64) of your machine.
If you email this file to a colleague running Windows, or even a different version of Linux, it will crash.
To distribute this code, we cannot ask every user to install a
Fortran compiler and run f2py. Instead, we use
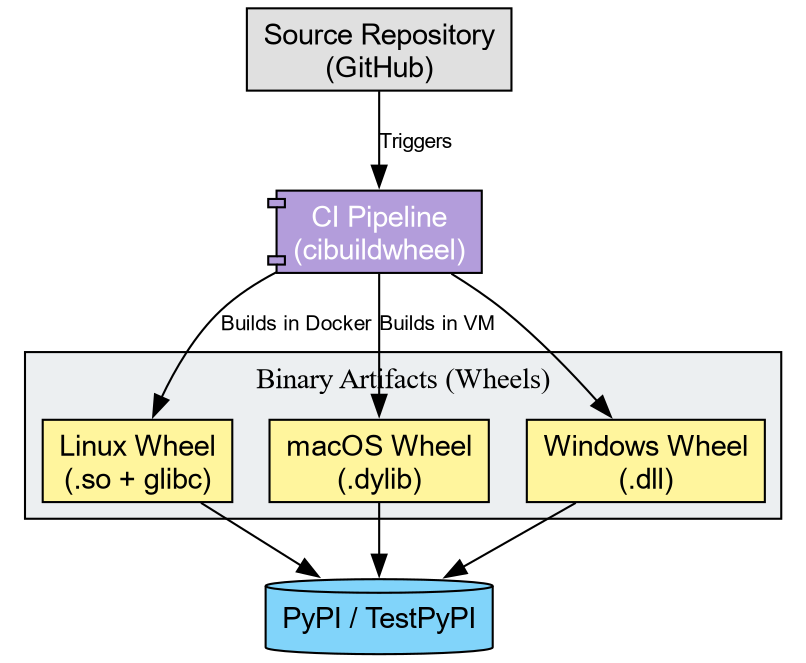
cibuildwheel to distribute binaries to end users.
A “Wheel” (.whl) functions as a ZIP archive containing
the artifacts we just manually moved. To support the community, we must
generate wheels for every combination of:
- Operating System (Windows, macOS, Linux)
- Python Version (3.10, 3.11, 3.12, 3.13, 3.14)
- Architecture (x86, ARM)
Tools like cibuildwheel automate this matrix. They spin
up isolated environments (often using Docker or virtual machines),
compile the code, fix the library linkages (bundling dependencies), and
produce the final artifacts.
Challenge: Conceptualizing the Pipeline
Imagine you publish chemlib. A user reports:
“ImportError: DLL load failed: The specified module could not be found.”
Based on today’s lesson, what likely went wrong?
- The Python code has a syntax error.
- The user’s computer lacks a Fortran compiler.
- The specific shared object for their OS/Python version was missing or incompatible.
Answer: 3.
The error “DLL load failed” implies the Python interpreter attempted to load the shared object but failed. This usually occurs when the binary wheel does not match the user’s system, or the wheel failed to bundle a required system library. The user does not need a compiler (Option 2) if they are using a Wheel.
The Manylinux Standard
On Linux, binary compatibility presents a challenge due to varying
system libraries (glibc). cibuildwheel addresses this by
executing the build inside a specialized Docker container (Manylinux).
This ensures the compiled .so file links against an older
version of glibc, guaranteeing functionality on the majority of Linux
distributions.
Challenge: Inspecting an Artifact
- Go to the PyPI page for
metatomic. - You will observe a file ending in
.whl. - Treat this file as a ZIP archive (which it represents). Unzip it.
- Locate the
.so(or.pyd) file inside.
Reflection: This binary file constitutes the actual product consumed by users. The Fortran source code effectively disappears, becoming baked into the machine code of this shared object.
-
Shared Objects: Scientific Python packages function
primarily as delivery mechanisms for compiled binaries (
.sofiles). - Installation: “Installing” a package physically amounts to copying these binaries into site-packages.
- Cibuildwheel: Automates the creation of binary wheels for all platforms, removing the need for users to possess compilers.